Friday, October 5, 2012

Shoggoth Test Sculpt with children plasticine

Heres some Pictures of a shoggoth i done as a test sculpting here.
I used a toothbrush to give this thing a little texture.


Learn more about Cthulhu Mythos.

Quick Tip Toothbrush as a Sculptingtool


You get nice results by using a toothbrush.
You can not only use it for a wooden texture, its also good for alien skin. 
What else comes in your mind let me know? Post it in a comment.

Friday, September 28, 2012

How to Sculpt the Purple Tentacle Video Tutorial is up


How to Sculpt the Purple Tentacle from the Retro Video Game Classic Day of Tentacle


I begin by making a wire armature. Its only a twisted Wire with aluminum foil formed in a cone over it.


Then i put the ends of the wire in a cork that it stays fixed when i work on it.


Now i kneating a little bit of Fimo to make it soft and easy formable. I make a flat piece of it.


 That i roll around the aluminum foil cone and cut off the rest that i don´t need

 I smooth the whole figure out by using the flat side of the Sculptingtool and blend everything together.


 Then i roll a Fimo Snake and put it around the bottom part of the cone. Press the snake against the form and blend it together.


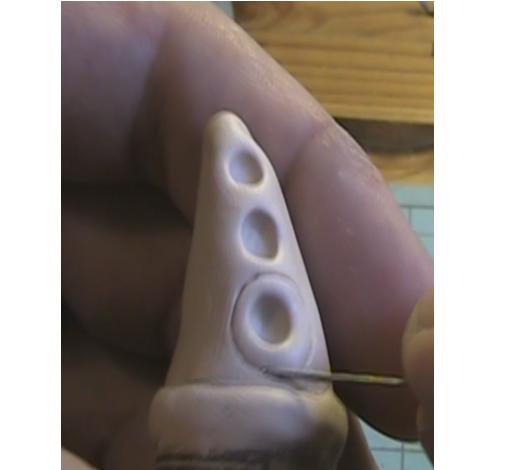
 I press a matchstick into the front side of the cone and form 3 holes.


Now i take a needle and draw a circle around every hole.


Now it already started to look like the rough form of the green tentacle.


 The top hole becomes the eye of the tentacle. With the Sculting Tool i press the top of the circle down and the edges a little bit up.


 With the middle circle i form the mouth by pressing the bottom part of the circle up.


When you are losing volume you can always add more Fimo. Make a little snake press it against the form where you need it and smooth it out with sculpting tools or a brush.


Always press the tools flat against the form to smooth it, you get a feeling for this very fast.

I make a little snake and shape it into a little s for the eyebrow and press it on the tentacle above the top circle.

 
Now its time to make the arms, form little cones and press them against the cone where the arm should be.


Blend it together with the cone, since the arm points upwards you push the Tool against the form and make downwards motions.

 For the other arm you use the same technique, but it points downwards, so you have to make  upwards motions to blend it onto the form.


 Smooth out the whole figure and you are ready to bake it and paint it. Hope you had Fun ;)


 You can also watch the video tutorial on Youtube when the upload is ready.


Thursday, September 20, 2012

No video this week :(

I really thought i can upload a video this friday, but the week was harder than i imagine. The fever is gone, but i still have a cold and i don´t want to upload unedited video footage, so i decided to let this week out. I hope i can make it next week. You can look forward to a sculpting tutorial. It will be a really easy miniature with an awesome status of epicness. So mark next Friday in your calendar and don´t miss it.

Sunday, September 16, 2012

How to make Floortiles


Totally forget to release the video on my blog, thank you fever... I feel a little bit better now, but dont know if i can make a video this week.

Friday, September 7, 2012

Fieldstones like the Hirst Art Ones

A long time ago in a galaxy far, far away.. 
i wrote about my Hirst Arts like Dungeon 2.0 Work and told that i wrote a tutorial on this.
Well, here is the written Version of ...

How to build your own Fieldstone

First you need some Lego Stones (the Colour really doesn´t matter) and build a mold for your Master Stone. I use the size of 3 Dots (1 inch) * 2 Dots.
You can build bigger Sections, but than you need more than a spoon plaster.
 

Then you mix a spoon plaster with a little bit water.


Throw the plaster into the mold and wait at least 30 minutes, you can also wait longer but the stone is easier to carve as long as it is not completely dry.


Remove the Stone out of the mold, be careful here if you don´t want to start from Beginning.


Use a pencil to draw the actual stones on the Master Stone.


Then use Sculpting Tools or a knife to carve out the little stones. Move your Tool back and forth along the line. You can do this slowly if you are just starting a project like this for the first time.
When you defined the little stones you can give them a bit texture that they don´t look complete flat on one side.  


 There you got it a stone that look like a Hirst Art Fieldstone.


Have Fun with it and check out the video when you got the time.


Monday, September 3, 2012

just working on a another Tutorialvideo

Just started to produce another simple Tutorial Video on How to Make HirstArt like Fieldstones.
Make sure you check it out, im pretty sure its ready on Saturday so that i can hold my timeline.

Saturday, September 1, 2012

Here I am YouTube


Hope You like it, i had fun producing it,
feel free to share it

Chaos Cultists Mask Tutorial Part 2

take a sharp knife and cut out the star


remove it from the mask 


Make some Goop:

A Mixture from Acryl, White Glue, Paint, Water and some Plaster


and paint it on the mask to strenght it


Remove the paper egg from the inside and cut the mask into the desired Shape


goop the edges and paint the mask with some black, brown, red


when its dry you take a paper towel, tear it into metalic paint and whipe it over the mask.


 Let it dry and you are finished :)
 

Heres my template of the Chaos Star feel free to print it out in your right size


Thursday, August 30, 2012

Chaos Cultists Mask Tutorial Part 1

Dark Vengeance is coming ...

so its the right time to build your own Chaos Cultist Mask.

You can wear it when gettin your new Starteredition.

First you need a few old Newspapers and some tape.


Crumble the newspaper to an egg shape, when you get the right form and size for your head fix it with tape.


Then you need some flour (cheaper is better, we dont wont to make a cake with it) and a bowl with water. Mix the flour and the water and stir it up well. Rip lots of stripes from the newspaper and tear it through the flour mixture. You can also use glue, starch, or wallpaper adhesive, but with flour it work also and its the cheapest version of paper mache. So you can spend some money on this and buy more minis ;).


Place the stripes horizontal on your egg shape, then do a vertical layer and then another horizontal and so on.


Let the mask form dry from time to time.
While that you can start to draw a Chaos Star Template like this one, done on a pizza box.


Cut out the Template with a pair of sissors.


I pinned it on the form and draw the star onto the form.


so and now its time for ...


part 2

Wednesday, August 29, 2012

letzter Post in deutsch

so es wird das letzte mal sein das ich in deutsch poste, zukünftig werde ich nur noch in englisch posten. Warum... nun vielleicht erreiche ich so ein größeres Publikum für meinen Blog, ich sehe zwar das Posts abgerufen werden aber niemand kommentiert etwas, ich hoffe das durch ein Umstellen auf englisch ein breiteres Publikum angesprochen wird und es dadurch vielleicht ein wenig mehr Aktivität auf meiner Seite gibt. Natürlich kann ich mich auch irren ...

aber hier noch schnell ein 3 Bilder von meinen Pepakura Space Marine Helm, fertig gespachtelt und schon ziemlich gut geglättet.